Introduction
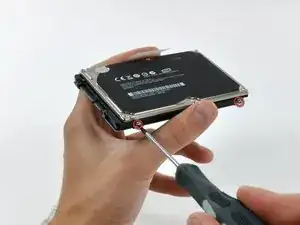
When replacing your hard drive, you must transfer the Torx screws from the old drive to the new one.
-
-
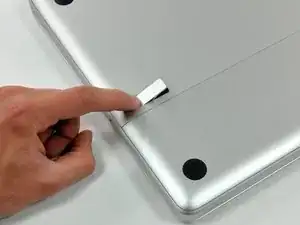
With the case closed, place the Unibody top-side down on a flat surface.
-
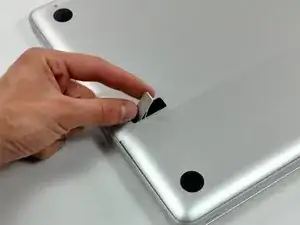
Depress the grooved side of the access door release latch enough to grab the free end. Lift the release latch until it is vertical.
-
-
-
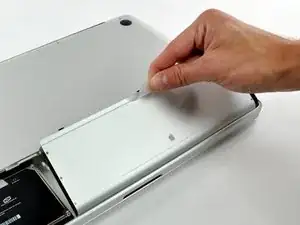
Grab the translucent plastic tab and pull the battery up and out of the Unibody.
-
If the latch is depressed it will lock the battery in place.
-
-
-
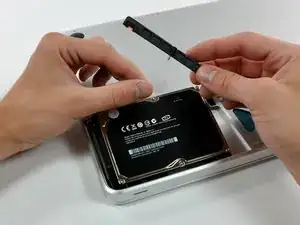
Lift the hard drive by its pull tab enough to grab and remove the retaining bracket.
-
Lift the hard drive out of the upper case, minding the cable attaching it to the computer.
-
-
-
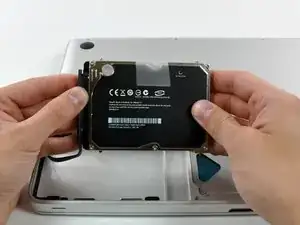
Remove the hard drive from its cable by pulling the cable connector straight away from the drive.
-


To reassemble your device, follow these instructions in reverse order.

7 comments
At step 7, the side screws are very tight. Both T6 Torx and 1.5 Hex keys dont work for me. I fear the screws could get damaged if i try more. How do i unscrew them?
svelcme -
What was your solution to removing the screws? I am having the same isse.
Perfect instructions. I am now running a Crucial SSD drive and the improvement is amazing. Thanks.
Carlos -
Hello
Sandisk X400 SSD proposed for this macbook works in 3gb/s?
There is a known limitation of nvidia chipset with ssd's who appear to work as sataI instead of sataii.
Thank you
Any news regarding this?
The A1286 has no Access Door.!!
I actually can see no sign of the battery!...
aguib -
I assume you have the newer model, with the built-in battery. It's still removable with tools, but these are the wrong instructions for that model.
lgc90 -
when will there be a guide for the other unibody macbook pro. that does not have an access door?
irishking -
Is there a manual to show, how disasembly the display, i mean, after step 5, to check the display between lcd and aluminiun back case?
Max
Max -
On other guides you state the height of the HD that can be supported, e.g. MacBook Pro 15" Core 2 Duo Model A1211 Hard Drive Replacement , I have read ( but have not confirmed ) that the uni-body MacBook Pro can be fitted with the 750GB and 1TB 12mm drive from Western Digital.
Can you confirm this?
Many thanks in advance.
ahothabeth -
My display and aluminum casing has separated.
I don't know if it just snaps back together or does it need to be glued.
I dropped mine on the carpeted stairs and the display still works.
I'm hoping I can just snap it back together and that no plastic pieces or teeth of the snapping
portion have been broken........
SHerwood Ball -
When you say "left fan" is this "left when looking at the logic board after turning the computer over and looking it up opening it up" or "left when sitting at the computer keyboard and typing on it"?
thvv -
We always use left and right in reference to the computer when you're using it.
Andrew Optimus Goldheart -
Directions were great and the worn dc in board was replaced. The hardest part of the procedure is disconnecting the data display cable. A better description of step 21 is to slide the connector parallel to the circuit board towards the outside corner. Reconnecting correctly took several tries.
I used the tip of the spudger to nudge the corners a little at a time to seat the connector.
The ribbon connector for the keyboard has to be inserted all the way before seating the retaining cap. It took me three tries . First try power button did not work second try numbers keys did not work.
Thanks for the directions ...could not have done it with out them!!!
landryd -
Hola. Poseo un MacBook Pro Late 2008 y debo cambiarle las cornetas. Me sirve unas cornetas de un MBP Late 2011?
jegonzalez80 -
Please read the instructions about removing the bluetooth cable - you CAN work around it, and NOT take off the plug.
kenneth krabat -